Quick guide
This guide will help you become familiar with the Quest QT850 terminal (referred to as terminal throughout this site) and deliver fast and secure payment processing for your business.
First Steps Checklist
If you have just received your first terminal, follow our First Steps Checklist before jumping into this guide.
QT850 Terminal Hardware Components
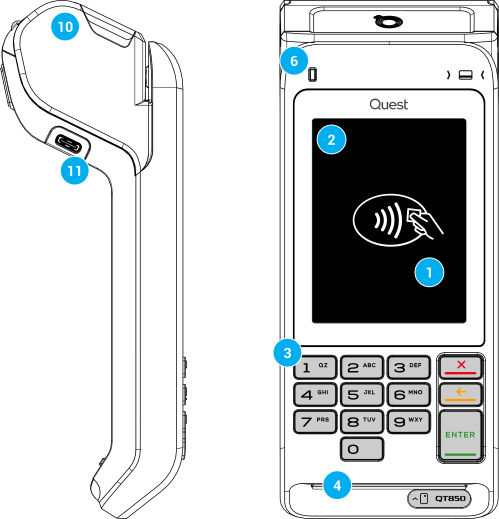
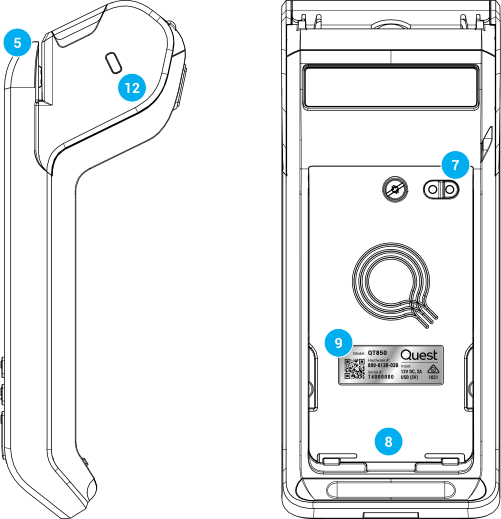
| Number | Description |
|---|---|
| 1 | Contactless Payment Tap Zone (onscreen) |
| 2 | 3.5" Colour Display with Glass Touch Panel |
| 3 | Tactile Keypad (use ENTER button to turn on terminal) |
| 4 | Smart Card reader with an illuminated entry slot |
| 5 | Magnetic Swipe Channel |
| 6 | Status Light |
| 7 | Charging Contacts (for charging via dock) |
| 8 | Back cover removal clips (for accessing Battery and SIM card slot) |
| 9 | Serial Label |
| 10 | Printer Paper Roll Access (for replacing printer rolls) |
| 11 | USB-C Charging Slot |
| 12 | Kensington Security Cable Slot |
Status Bar Icons
At the top of the terminal's display, an area is reserved for the display of key status indicators.
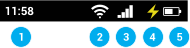
| Number | Description |
|---|---|
| 1 | Time of Day (controlled by the Acquirer / Bank, not set on terminal) |
| 2 | Cellular Signal Strength (if Cellular is enabled) |
| 3 | Wi-Fi Signal Strength (if Wi-Fi is enabled) |
| 4 | Terminal Charging Indicator |
| 5 | Battery Charge Level Indicator |
Printing Processes (Standalone Terminal)
Fitting a Paper Roll
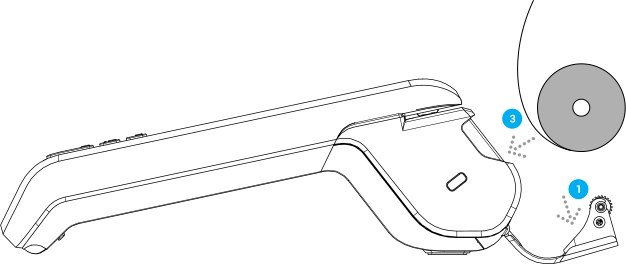
- Open the printer door by pinching the door on both sides with two (2) fingers. Pull backwards to rotate open.
- Remove any leftover paper and discard.
- With a new roll, unpick the roll's start (usually glued down). Place the roll in the cavity, ensuring that the paper is feeding off the underneath of the roll.
- Before closing the lid, pull out a small amount of paper, then close the lid by pressing on the 'Q' or 'Quest' logo in the middle area of the printer door. The lid is closed once you hear and feel a 'click'.
- Tear off excess paper by either pulling paper from one side toward you, or push away from you (pulling is recommended).
- Optionally, open the menu, and press the 'Feed Paper' button.
Reprinting a Receipt
To reprint the previous receipt:
- Select the menu (☰) icon on the top left of the amount entry screen.
- Select Last Transaction
- Select Print
Ordering Paper Rolls
Paper rolls can be ordered online at https://www.shop.questpaymentsystems.com/
Bootup & Shutdown
Bootup
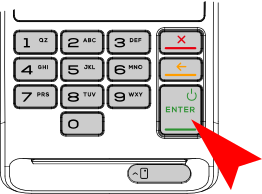
To power on the terminal, press the large 'ENTER' button for a few seconds. Once display turns on, release the button and allow 2 minutes for terminal to load.
If your terminal does not turn on
If terminal does not turn on as expected, the battery may be depleted. Charge the terminal and wait 10 minutes. The terminal will bootup once it has sufficient battery charge for operations.
Waking up
If the terminal is on but the display is dim or off, simply press any key on keypad to wake the terminal up (display will turn on immediately).
Shutdown or Restart
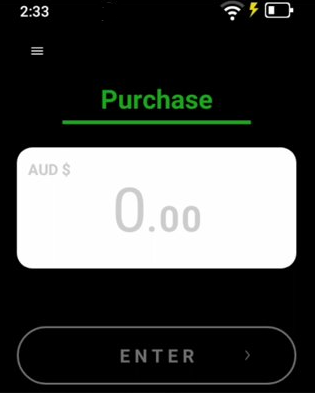
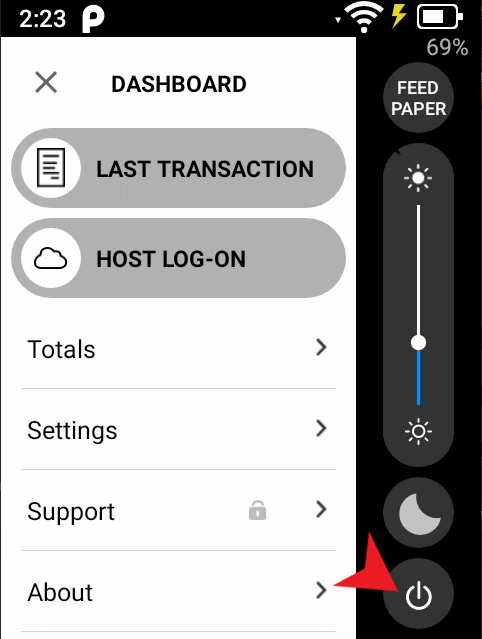
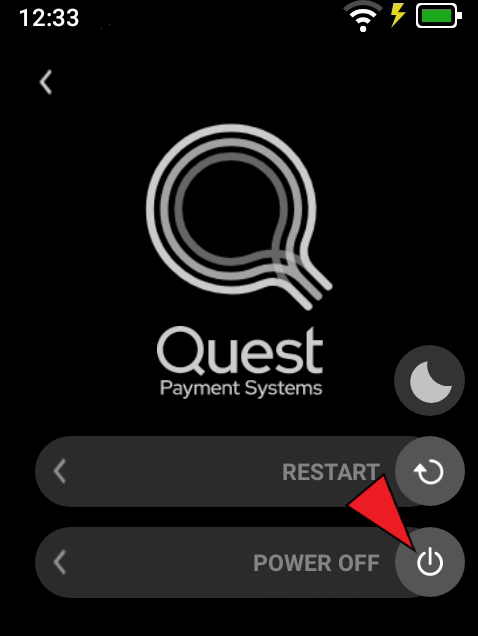
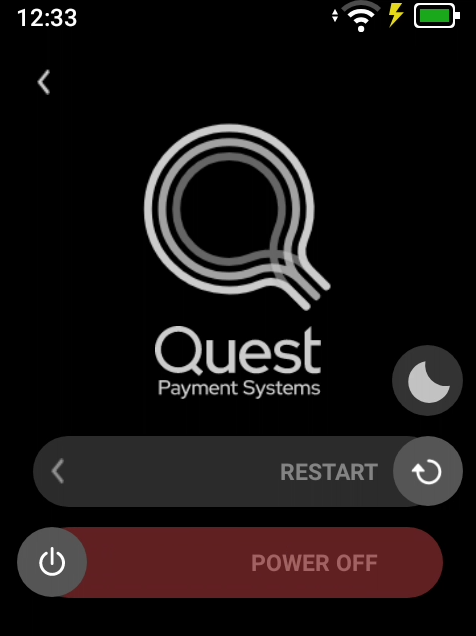
To power off or restart the terminal, enter the Menu by tapping the onscreen 'Menu' button (☰). Then tap the power icon button to display the shutdown prompt. Move the Power Off or Restart slider from the right to the leftmost side of the bar to shut down the terminal.
Charging the Terminal
Fully charge the internal battery using the provided QT850 charge dock accessory (recommended) or via a Quest supplied USB-C charging cable & power supply.
Setting up the Dock
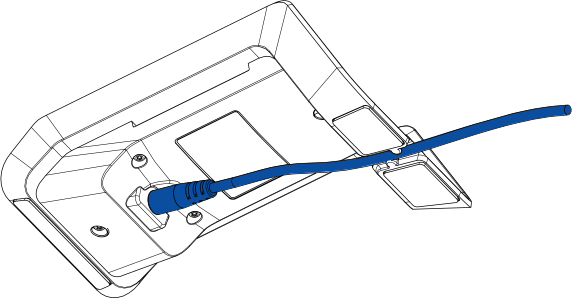
The QT850 charge dock is supplied with a 12V power supply. Connect the 12V power supply to the round socket underneath the dock, feeding the cable through the retention channel. Plug the 12V power supply into a power outlet and switch on power. The orange light on the dock will illuminate once power is supplied.
Only use the power supply provided with your terminal or dock
Only use the power supply provided with your terminal / QT850 charge dock. Using another power supply may cause damage, fire or electrical shock and void your warranty.
Charging using the Dock
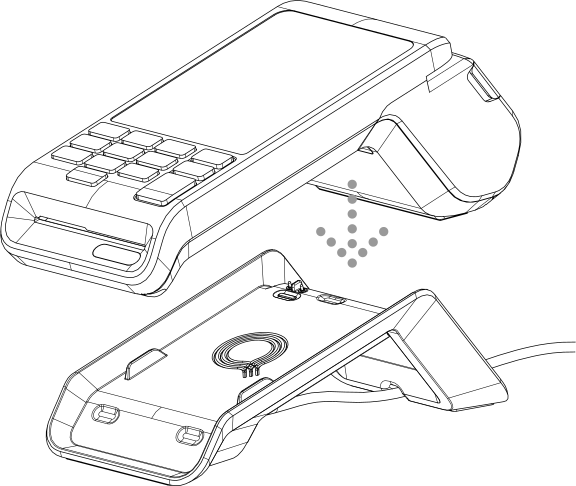
Simply place the terminal onto the charge dock. The electrical contacts on the dock will make contact with the matching electrical pads on the terminal and begin recharging.
Charge for a Minimum of 3 hours on First Use
Total first-time charge period using the dock should be a minimum of 3 hours (whilst not being used).
Charging with a Cable
As a backup, the terminal can be recharged by plugging a standard USB Type C cable into the side of the printer. Plug the other end (USB Type A) into a 5V, 2.1A power supply (available from support). This recharge method will be slower.
Whilst your device is charging
If the terminal is off, and then placed on charge, the terminal will turn on automatically. If left untouched, the screen will dim in brightness and after further inactivity the display will turn off whilst continuing to recharge. The status light will glow to indicate the terminal is on, but idle / asleep. See Understanding the Status Light section below to understand more about the status light and what the colours and modes mean.
Low Power Alerts
The terminal will provide a pop-up message when the battery level is getting low. The status light also provides a visual alert on battery status.
Understanding the Status Light
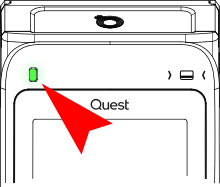
The status light is positioned above the display in the top left hand corner. In a cordless terminal, the status light indicates battery charging status, and alerts of a critically low capacity battery. See table for more detail:
| LED Colour | LED State | LED Meaning |
|---|---|---|
| - | Off | Terminal is on, not charging. Battery is >25%. |
| Orange | Solid | Terminal is not on charge. Battery is low (<25%). |
| Orange | Rapid Flash. (0.5s ON, 0.5s OFF, repeat) | Terminal is not on charge. Battery is critically low (<10%). |
| Orange | Slow pulse | Battery is put on charge in dock or cable is connected. Battery level is 0%-25%. When 25% charge is reached, pulsing changes to green. |
| Green | Slow pulse | Battery is charging on dock or using USB cable. Battery charge level is between 25%-99%. |
| Green | Solid | Battery is 100%. Terminal is on dock or has cable connected. |
| Green | Intermittent Flash (0.1s ON, 0.1s OFF, 0.1s ON, 5s OFF, repeat) | Terminal is in sleep mode. Battery charge level is >25%. If terminal is awoken, the LED turns off. |
Connecting to the Internet
The terminal must connect to the internet in order to process transactions and receive updates. Your terminal will be shipped with SIM installed and cellular enabled.
When setting up your terminal for the first time, it is recommended that you connect to a trusted Wi-Fi network (rather than relying on the 4G network). Using a Wi-Fi connection will allow the terminal to update its software and configuration quickly if required and ensure you have network redundancy, should your 4G network become unavailable.
Connecting via a Wi-Fi network
See Wi-Fi Configuration for details on how to connect to Wi-Fi.
Connecting to a Cellular (4G) network
See Cellular Configuration for details on how to connect to the mobile cellular (4G) network.
Settlement
Settlement Enquiry
A Settlement Enquiry retrieves your current totals and groups those totals by card type. It can be attempted as many times as required without cutting your terminal over to a new settlement period.
| Step | Instructions |
|---|---|
| 1 | Select the Menu button (☰) from the top edge of the display and then the Totals button. |
| 2 | Tap 'Settlement Enquiry' to retrieve the current totals. The report will be displayed on the terminal for viewing or printing. |
Settlement Cutover
A settlement cutover informs your acquiring bank that you, the merchant, is closing the current settlement period and is 'cutting over' to a new settlement period. All transactions performed after the Settlement Cutover has been performed will appear in the next settlement period. Cutover is a merchant passcode controlled action. Typically, a cutover is performed as part of your businesses end of day procedures, or in some case, the end of a 'shift'.
| Step | Instructions |
|---|---|
| 1 | Select the Menu button (☰) from the top edge of the display and then the Totals button. |
| 2 | Tap Settlement Cutover. |
| 3 | Select CUTOVER NOW. |
| 4 | Your terminal will contact your acquirer and attempt to cutover to the next settlement period. The result of the settlement cutover will be displayed at the top of the screen and then a report which details your totals for each card type. If your settlement cover is failing, see Troubleshooting & FAQ section for common errors and resolutions. |